
because several of you have asked me how,
I decided to show you. These are so easy
to make.
you will need:
Plaster of paris
pretty cupcake liners and a cupcake pan
cute little accents to use as cupcake toppers
toothpicks
hot glue
medium size styrofoam balls
lightweight spackle
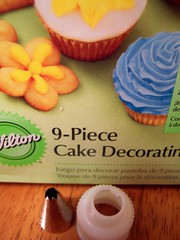
cake decorating kit
glitters in what ever colors you like
(optional, acrylic paint if you choose to
color your frosting)

step 1: place cupcake papers in cupcake tins.
step 2: mix plaster of paris according to
directions, (usually 2 parts plaster and 1 part
water.) To make 6 cupcakes, I use 2 cups of
plaster and 1 cup of water.
Stir well and then fill cupcake liners. These
need toset for about 24 hours.

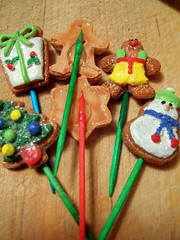
step 3: decide what your going to use for your
toppers and glue toothpicks on the the back
of them. I used my hot glue gun.

Step 4: cut three styrofoam balls in half. These
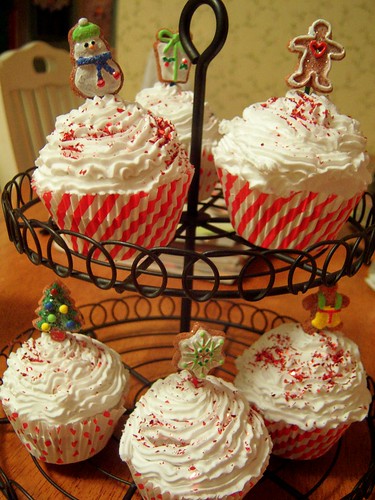
will be the tops to your cupcakes.
Step 5: have some snacks! lol!

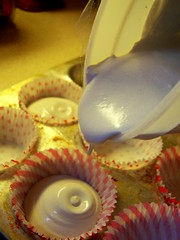
Step 6: you will need lightweight spackle and
a cake decorating kit. If you are choosing to
color your frosting something other then white
you will want to mix some in a bowl with a few
drops of acrylic paint. I like plain white for
christmas. Load your frosting bag using the tip
pictured above.
(sorry I dont know what that tip is called!)
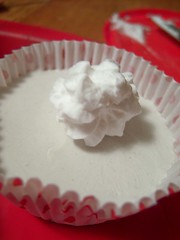
Step 7: put a glob of "frosting" on the plaster
bottom and then press one of the half styro-
foam balls on top.
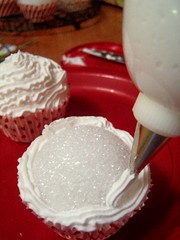
Step 8: Now you can pipe your frosting onto
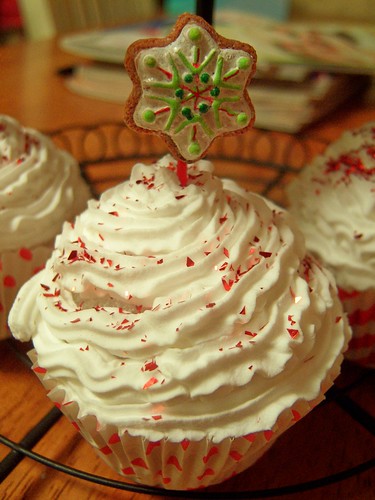
the top of your cupcakes.
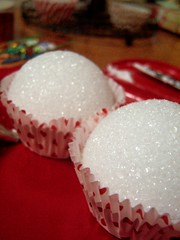
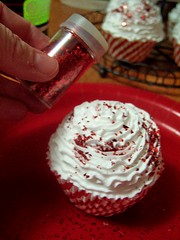
Step 9: sprinkle with glitter and gentle push
your topper in! Then leave them to sit a few
days until you're sure they are totally hardened!
Now be prepared to warn people that they cant
eat these! because they will think they can!!
have fun!!
17 comments:
I have never seen anything like this before!!!! how adorable...came across your blog, and I have added to my blog list...ok??
thought people viewing my blog would also enjoy yours!
cheers!
Thank you, Viv, for posting the tutorial. They look so real! I love decorating my kitchen with fake candy and gingerbread. I can't wait to try the cup cakes!
These are so cool! I have your 4th of July one from your swap this summer and I got lots of comments on it.
OHHHHHHH!!! Thank you, Viv! I love these & I am going Thursday to Hobby Lobby where I STRONGLY suspect I'll be stocking up on Plaster of Paris! You are so sweet & generous to share the tutorial! I just LOVE you!
Oooh you used styrofoam balls to make them so high!?! Thanks for sharing the tutorial! My girls have been asking to make these all week.
Happy Birthday to Torry for this Thursday! I can't believe he is already turning 1!!!
Hugs!Sandy
They do look so realistic! ...haha...I just came over catching up on your blog, went to mine, and saw your comment. Talk about busy, busy. You never stop either.
I actually did the artwork for my mother-in-law in August. Had a Home Show in Nov., have been doing a warehouse show, putting in at shops...and feel like I have no artwork to show for it.
I want to just relax and have fun doing artwork and getting ready for Christmas. I am working a lot to pay bills. Wish I earned more and worked less. I need some me time . Seem to always be playing catch up.
Torry Pie is such a doll baby!!!!!Lucky, lucky Gma, and another on the way!
One more little show-My niece is doing a Zumba for the Troops and is having last minute shopping, so I am traveling 2 hrs. to set up for a 2 hr. event to raise $ for the troops, then go to her house to celebrate my sis's b-day as she's coming down from NY.
Be blessed.
Oh garsh, my kids'd kill me if I made these! They look so yummy:-P Actually I might make some just to torture them... cuz that's the kind of caring mama I am;-)
DELIGHTFUL!!!
(I especially like step 5! hee hee)
{{{Hugs}}}
Linda
Thanks for the tutuorial. Really cute idea!
Viv,
I have been away from my blog for a few days! I saw this and went nuts!!!!!! THANK YOU! I just love these!!!!! I am going to try to get some done for my neighbors this year, but if not for Christmas, for Easter for sure!!!!! GREAT tutorial by the way.....:):) Sandy
Thank you! I don't expect mine to look as good as yours, but I'm gonna try it!
Thank you for the lesson Viv, I can't wait to try this :)
Merry Christmas!
Great Tute, Thanks! I just used it on my blog...very informative!!
These are sooo cute, thanks so much for sharing the how to with us!! I liked around step 5....grab some snacks! My kind of project!! LOl! :) xo Holly
These are really cute!
I had to see how my cupcakes from the swap were made. I used them as table decorations for a brunch on Sunday and everyone wanted to take them home. I had to frisk my MIL before I let her out the door.
Post a Comment